Showing posts with label Recipes. Show all posts

Sunday, December 18, 2011

Dueling Chowdahs: Weeks 47 and 48

This month I have been in search of a perfect corn chowdah (must say it like you are from Boston. It taste better that way). Soup in the wintertime is a source of warmth and comfort, and I am anxious to expand my cooking repertoire.

Plus, we needed to audition soups to take to the Benson Christmas dinner this weekend.

It was only fair to have a cook off between two recipes. One recipe is per a cookbook we received as a wedding gift and have only discovered its genius (America's Test Kitchen Family Cookbook) and the other one was found on Pinterest.


Corn Chowder

Serves 6
Prep time: 15 minutes
Total Time: 1 hour

10 ears fresh corn, husks and silk removed (we substituted frozen corn. Directions below)
4 ounces bacon (about 4 slices), chopped fine
1 onion, minced
2 garlic cloves, minced
3 tablespoons all-purpose flour
3 cups chicken broth
2 cups whole milk (I just used 1 cup 1 percent)
12 ounces red potatoes, scrubbed and cut into 1/4-inch cubes
2 bay leaves (didn't have this but I am sure it would just add to the flavor)
1 teaspoon minced fresh thyme or 1/2 tsp. dried
1 cup heavy cream (didn't include. Do you usually keep cream on hand?)
2 tablespoons minced parsley
Salt and pepper to taste

1. Cook bacon in a large Dutch oven (I just used a regular pan) over medium heat until crisp, about 8 minutes. Stir in the onion and cook until softened, about 5 minutes.
2. Stir in the garlic and cook until fragrant, about 30 seconds. Stir in flour and cook for 1 minute.
3. Slowly stir in the broth and milk, scraping up any brown bits. Stir in potatoes, bay leaves, thyme and grated corn.
4. Bring to a simmer and cook until the potatoes are almost tender, about 15 minutes.
5. Stir in remaining corn kernels and cream. Continue to simmer until corn kernels are tender yet still slightly crunchy, about 5 minutes. Discard bay leaves. Stir in the parsley and season with salt and pepper to taste before serving.

Rating: 4. Delicious. However, the potatoes were cut too small for me to easily pick them out (I hate potatoes). And I omitted the cream (I never have cream on hand) so it wasn't as creamy as I would have liked it to be.

Note: How to use frozen corn: Puree 1 pound of frozen corn in blender with broth until smooth. Omit flour in step 2 and use the pureed frozen corn in place of grated corn.


Summer Corn, Bacon and Potato Chowder

Serves 4
Cook time 15 minutes
Total time 25-30 minutes

Instructions

1. Pierce potato in several places with a fork; microwave on high power until tender, turning over once, about 8 minutes. Allow to cool; peel and mash.

2. Meanwhile, coat a large saucepan with cooking spray. Add celery, onion, corn and red pepper; sauté over medium-high heat for 5 minutes.

3. Stir bacon and milk into saucepan; stir in mashed potato and mix well. Season with salt, pepper and hot pepper sauce; stir to combine. Cover and simmer 10 minutes (do not allow to boil). Yields about 1 1/2 cups per serving. 


Rating: 4.7. LOVED this soup. The flavor was strong, yet delicious. And I loved having the potato mashed. I could barely even taste it! The extra veggies really made this soup hearty.

Note: I would add more liquid. It was more corn with some liquid instead of just soup. Also, corn on the cob really made a difference. The taste was elevated.

*This recipe is no longer "Weight Watcher approved." I doubled the bacon because I wanted to. I am pretty sure that negates the endorsement. Oh, well.


And the winner is...... SUMMER CORN, BACON AND POTATO CHOWDER!!

Christmas dinner, here we come!


Monday, November 28, 2011

Week 43: Greek Style

I am definitely behind on my weekly new recipes, but I have to kick it up to make it 52 new recipes this year. I can do it!

To start, we did it Greek style (kind of) at our house. This was another meal of necessity because we happen to already have everything (and every other recipe we were missing something).


Spinach and Feta Pasta
from Our Best Bites cookbook

8 ounces penne pasta
1-2 tablespoons EVOO
1 onion, finely chopped
5 cloves garlic, chopped or minced
3 cups fresh spinach (my favorite!)
1 (28 oz. can diced tomatoes
4 ounces feta cheese, all crumbly
Salt and pepper to taste

1. Cook pasta according to package.
2. While pasta is cooking, heat up some EVOO in a skillet over medium heat. Add onion and garlic. (This is my favorite smell in the entire world.)
3. After onion is tender, add spinach and cook until wilted.
4. Add tomatoes and heat through.
5. Add drained pasta and crumbed feta. Season with S & P.
6. Heat and serve. Top with some extra feta.

Rating: 4.6. Loved this meal. It was creamy and flavorful and practically everything was a vegetable (besides the pasta). Plenty of flavor. I am just sad we didn't make enough for leftovers.

Friday, October 28, 2011

Week 42: Carrots to die for

Cooking has been put on the back burner. {pun intended}
Added stress/anxiety at work has resulted in me in a coma after each work day.
So weeknights are turning into a panic of what to make for dinner, so new recipes were not an option.

From a non-inventive dinner week (or should I say weeks) one new recipe did come out on top. Just in time for a family dinner. Perf.

Brown sugar-glazed Carrots with Rosemary


Recipe adapted from "Real Simple Magazine"

3 pounds carrots, sliced into discs (round slices like above)
1/2 cup packed light brown sugar
4 tablespoons butter
2 sprigs fresh rosemary, chopped (better from the garden!)
1/4 teaspoon cayenne pepper (ok, I didn't use this, but a dash might be a fun flavor)
Salt and pepper

1. In a large saucepan combine all ingredients with 1/2 cup water.
2. Bring to a boil, reduce heat, cover and simmer for about 8-10 minutes, or until the carrots are doftened.
3. Uncover and cook, stirring often, until the carrots are tender and the liquid has thickened, 10-15 minutes more.
4. Put in serving dish and enjoy!


Note: I didn't understand the recipe. I chopped the rosemary and just left it in. And when the recipe said to take the rosemary out, I was so confused. Apparently, I was not supposed to chop the rosemary but to put the whole sprig in. But I liked it chopped so I am going to go with that.

Rating: 5. I was so sad there were not any leftovers. We're talking tears. I'll have to make my own batch to just eat all myself. No sharing.

Wednesday, October 12, 2011

Week 40 and 41

Typing weeks 40 and 41 panic me a little bit. There are only 11 or 12 weeks left in the year! What?!

Where has my life gone?

While I contemplate who I really am and finish panicking, here is what we've been eating.


So, I'm not so much of a broccoli fan. Unless it is in broccoli cream soup, and let's just be honest. Broccoli cream soup is more about the cream than the broccoli.

So when we got a head of broccoli in our BB, I was on a quest for green greatness. And, my blogging friends, I have found it.

Week 40: Blackened Broccoli
Recipe from Lunges and Lashes, fitness blog by a health guru who happens to be my hair stylist

A bunch of broccoli, chopped into florets
Minced garlic
S &P
Olive Oil

1. Start by putting broccoli and a heaping spoonful of garlic in a bowl.
2. Roll them around in EVOO.
3. Sprinkle with S & P.
4. Broil in oven until blackened, then flip and broil some more. But you don't want them charred, just nicely blackened.


Note: You want the garlic to be all over the broccoli. So how much you use depends on how much broccoli you have. Also, I am not sure if this would work with frozen broccoli.

Rating: 4.5. The roasted garlic had almost a sweet flavor. It made broccoli delicious. And you can never go wrong with garlic.

Sub note: every time we eat broccoli, Jacob tells me how he used to pretend they were trees and he was a dinosaur. (When he was a kid, of course.) This makes me laugh every time.

Week 41: Eggplant Rollatini
Found in Giada's cookbook "Everyday Italian." Online version here.

No photo. Dinner was insanely late that day. 

2 eggplants
16 ounces ricotta cheese
1 large egg, lightly beaten
1/4 cup shredded mozzarella cheese
A few shakes of grated Parmesan cheese
10 basil leaves, chopped
1 cup tomato sauce

1. Preheat the grill pan and preheat the oven to 375 degrees F.
2. Place a rack over a large baking sheet. Cut the 2 ends off the eggplant. Cut the eggplants lengthwise, into 1/2-inch thick slices. Arrange eggplant slices onto rack. Sprinkle with sea salt to help remove excess moisture and any bitterness from the eggplants. Set aside for about 10 to 15 minutes. Rinse off the salt from the eggplants and pat dry with a towel.
3. Spray hot grill pan liberally with vegetable spray and then place eggplant slices on the grill until lightly browned on each side and tender, about 4 minutes per side. Remove slices from the grill pan and allow to cool.
4. In a large bowl, beat eggs until lightly scrambled. Mix the ricotta in with the egg. Add mozzarella, 3 tablespoons of Parmesan cheese and toasted pine nuts and gently combine. Fold in basil just to combine. Do not overmix.
5. Place a tablespoon of the cheese mixture on 1 end of the eggplant and roll up tightly. Place the eggplant rollatini into a greased (with olive oil) 13 by 9-inch baking dish, seam side down. Continue with remaining eggplant. Evenly distribute the tomato sauce on top of the eggplant rollatini. Season with salt and pepper. Sprinkle with remaining 5 tablespoons of Parmesan cheese and bake for 15 minutes. When cooked, drizzle the top with extra-virgin olive oil.

Rating: 3. It was pretty good. But I won't ever crave it or want to make it again. A lot of work. And I liked the insides better without the eggplant. Maybe I needed to cook it longer?

Friday, September 30, 2011

Week 39: Grilled Chicken with Peach BBQ sauce

With our aforementioned peach overload, we found a great recipe to use peaches for a main dish instead of a traditional dessert. And from Gwyneth Paltrow no less.She's good for more than just guest starring on 'Glee.'

Gwyneth Paltrow's Grilled Chicken with Peach BBQ Sauce
Adapted from Bon Appetit


 Ingredients

  • 1 cup chopped peeled fresh peaches or 9-10 ounces frozen sliced peaches, thawed, chopped
  • 1/2 cup ketchup
  • 2 tablespoons lemon juice
  • 2 garlic cloves, minced (I love mine from a jar)
  • 1 teaspoon soy sauce
  • Salt and freshly ground black pepper
  • 4 skinless, boneless chicken breasts or 8 chicken tenderloins (our personal favorite)
  • Vegetable oil 
1. Combine first 5 ingredients in a small saucepan. Season lightly with salt and pepper and bring to a boil over high heat. Reduce heat to low; simmer until peaches are very soft and flavors meld, about 10 minutes. Remove pan from heat; let cool. 
2. Pour peach mixture into a blender and purée until smooth. Season to taste with salt and pepper. 
3. Place half the sauce in a medium bowl; add the chicken and turn to coat. Let marinate at room temperature for 20 minutes, or cover and chill for up to 8 hours, turning occasionally. Cover and refrigerate remaining sauce.
4. Prepare a grill (we use a Foreman) to medium-high heat. Grill chicken until browned and almost cooked through, 4-5 minutes per side. Brush on all sides with reserved sauce; grill until glazed and cooked through, 1-2 minutes per side. Slice crosswise. Serve remaining sauce alongside.

Rating: 4. The chicken really flavorful and moist. But I did not like the sauce on the rice we had as a side. A great mixture of flavors. Not one overpowered the other to create the delicious sauce.

Note: After a long day at work, Jacob made this for me. I didn't lift a finger. Love him.

Wednesday, September 28, 2011

Week 38: peaches coming out of our ears makes sweet jam

 
We are lucky enough to have a fully mature peach tree.
With the funky weather, the peaches were a bit late this year, but they made up for it by producing big time.
Every day I would go out and pick up bags full of peaches that had just fallen.
Within days we had peaches taking over our kitchen and our lives. Sound dramatic? I have issues with throwing away perfectly good (and FREE!) produce.

So we hunkered down and canned jam.
But a funny thing happened when we turned the bottles over....

Introducing.... levitating jam!
To our shock and amazement, the jam has stuck. In every. single. jar.
And now we have some quirky holiday gifts. Maybe more appropriate for Halloween?
On the positive side, all of the jars sealed perfectly!

I won't bother posting the recipe. Just follow the directions on the box of pectin you purchase. Just prepare yourself with a lot of sugar and a sticky little mess. I would say this is a two-person job.

Rating: 5. Nothing beats homemade jam. While strawberry freezer jam is a Benson favorite, the peach will be just as loved. If you have room in your freezer, freezer jam is easier and quicker.

Note: After a quick plea on facebook for someone to help us with our peach overload, I came home from work the next day to find our tree picked empty. Now I don't feel overwhelming guilt every time I look out of our window. (We really had a lot of peaches.) Ah, the power of social media.

Monday, September 26, 2011

Week 36 and 37: Lasagna with breadsticks

More than any other origin of the world, our food revolves around Italian-style food.
Is is true Italian? I wish. But here is how we celebrated the beautiful county this week.


Week 36: Lasagna Rolls
Adapted from 'Cook This! Not That!'

10- 12 lasagna noodles
6 oz Italian-style chicken or turkey sausage, or any other ground meat
1 bag frozen spinach, thawed
1/4 tsp. red pepper flakes
Pinch of nutmeg
Salt and pepper to taste
1 cup low-fat ricotta cheese
1 bottle of marinara sauce
3/4 cups shredded mozzarella cheese

1. Boil lasagna noodles and cook al dente. Drain.
2. Meanwhile, brown the sausage/meat. Add spinach, pepper flakes and nutmeg and cook until the spinach is warm. Season with S & P. Remove from heat and cook. Combine with ricotta in a large bowl.
3. Preheat oven to 400 degrees. Spread a thin layer of marinara at the bottom of a 13 X 9 inch baking dish.
4. Lay out noodles on a cutting board and cut in half crosswise. (So you have 20-24 shorter pieces.)
5. Place a large spoonful on spinach mixture in each noodle and roll up tightly. (Not too tight that it oozes out the side.) Place rolls in marinara dish.
6. Cover the rolls with the rest of the marinara sauce, then with the cheese.
7. Cover with foil and bake for 15 minutes. Remove foil and bake for another 10 minutes.

Rating: 4.8 with some adjustments.

Notes: Noodles were too al dente for us. Also, if you are using just plain ground meat, add some Italian seasoning. It was a little bland without it. Be generous with the marinara sauce. Ours lacked a bit.

Also, this recipe makes for 6 servings. We ate it for the rest of the week.

The Miamaids came over to my house for a little lesson on how to make breadsticks.Try to guess which ones are the girls and which ones are the leaders. (I'm often mistaken for a tall young woman.)

Not only did we eat ourselves silly with plenty of carbs and watch my skydiving video, they got to play around in my aprons. (You can't see Tami's but it is a floor-length apron from my great-grandma.)

Week 37: Italian Breadsticks
Yield: 36 small breadsticks
Time: 45 minutes start to finish
Recipe from Jamie Cooks it Up

1 1/2 C warm water
2 T sugar
1 T yeast
1/2 t salt
3 1/2- 4 C flour
1/4 C butter
3/4 C grated Parmesan or mozzarella cheese
Johnny's Garlic Seasoning (purchased at costco) or garlic salt

1. Mix the water, sugar and yeast together in a measuring cup or in the bottom of your mixer. Let it sit for 5 minutes.
2. Add the salt and the flour, one cup at a time, until it is well incorporated. Mix on high for 5 minutes. Let the dough rest for 5 minutes.
3. Melt the butter and pour half of it into a jelly roll pan (large cookie sheet).
4. Place the dough in the center of the pan. Let it sit for 2 or 3 minutes. Letting the dough rest makes it MUCH easier to shape.
5. Spread the dough out flat onto the pan until it reaches all of the edges. Doing all of the spreading and cutting of these bread sticks, in the pan makes cleaning up your counter so much easier!
6. Pour the other half of the butter onto the dough. Spread it around with your hands. Sprinkle the Johnny's Garlic Seasoning all over the dough, and then the Parmesan cheese.
7. With a pizza cutter cut the dough into three rows lengthwise, and then into about 12 little height wise rows.
8. Put the pan into a 170 degree oven for about 7-10 minutes. The breadsticks should rise about 1 inch.
9. Turn you oven up to 350 and bake for about 12 minutes, or until golden brown.
10. When they come out of the oven let them sit and rest again for about 5 minutes. Then redefine your cutting lines with the pizza cutter.
11. I use a pair of cooking scissors to cut the edges where the pizza cutter can't reach.

Rating: 3.5. These are fine, but not fabulous. Maybe a little more salt in the seasoning? Cook a little longer?

Note: If you make this with a Bosch mixer, you need to double the recipe. With an extra batch I made Cinnastix. Trade the garlic seasoning for a mixture of 1 cup of sugar and 1/2 tbsp of cinnamon. I also put a dash of nutmeg because I am just that wild.


Sunday, September 11, 2011

A day free of labor

Long weekends make my life.
I work M-Th so holiday weekends make for a 4 day break.
Love.
I look forward to them all year long.
Labor Day weekend is such a weekend.


The best part about a holiday is no responsibilities for either of us.
We get to just hang out all day together.
Bliss.

After running a few errands, perusing Borders (still over priced at 70% off), we had lunch in the canyon.

Along with everyone else in Utah County. It was packed.

And we decided to hike Stewart Falls on a whim.
Also along with everyone else in Utah County.
Great minds think alike.

A rare photo of the trail without a single person on it. (For now.)

Timp from the back side.

The Falls.
Sundance. I would die to have a cabin there.
Or know someone who has a cabin there.

A handsome hiker who carried my bag the whole way.

The hills are alive.......


Right after I took this picture a dad told his kid never to get near the berries.
I guess I was being a bad example.

There was a distinct rustling in this part of the woods.
The offender was never caught.

We got very dusty.


The weather was perfect (overcast and breezy) and the crowds died down toward the end.

We ended the day with a delicious and also impromptu meal.
Necessity and lack of time is where our best ideas come from.

Tuesday, August 30, 2011

Week 32- Grilled Tuscan Chicken with Rosemary and Lemon

Our rosemary plant has been neglected this season because the oregano and basil have taken over, so I forget about our little rosemary. Hopefully this recipe will make up for it.

Grilled Tuscan Chicken and Rosemary and Lemon


Ingredients
  • 2 tablespoons chopped fresh rosemary or 1 tablespoon dried rosemary
  • 1/4 cup olive oil
  • 2 garlic cloves
  • Salt and pepper
  • 1 chicken (3 1/2 to 4 pounds), (we used  chicken tenders)
  • 1/4 cup fresh lemon juice

Directions

  1. Heat grill to medium. In a small saucepan, bring 1/3 cup water and rosemary to a boil; remove from heat, cover, and let steep 5 minutes. Transfer to a blender. Add oil and garlic; season with salt and pepper. Puree until smooth; let cool.
  2. Combine chicken and rosemary oil in a shallow dish or resealable plastic bag, and turn to coat. Cover, and let marinate at least 15 minutes at room temperature or overnight in the refrigerator, turning chicken occasionally.
  3. Remove chicken from marinade; place on grill. Discard marinade. Cook, basting frequently with lemon juice and turning as needed to prevent burning, until cooked throughout, 20 to 30 minutes.

    Rating: 3.7. The chicken was a little dry. I am not the best at knowing when it is done. I convince myself there is pink because I am so nervous about food poisoning. I blame myself for this.

    Note: I halfed the recipe and it was perfect for dinner and leftovers for lunch. We used 6-7 chicken tenders instead of a whole chicken and we grilled them on our Foreman grill. We served it with grilled zucchini and Rice Almondine (a FAVORITE, but it would be better named as Rosemary Rice).

Monday, August 22, 2011

Week 29 and 30: Pizza Margherita

I am going out of town this week for a family reunion, so I am counting this meal as two weeks because I used two recipes.

I love homemade pizza and I wanted to find other ways to use our fabulous basil from our garden.

Enter Pizza Margherita. This is a two-for because we made the dough from scratch as well.


Easy and Basic Pizza Dough
From Just Cook Already

1 cup warm water
1 package dry yeast or 2 1/4 teaspoons yeast in bulk
1 tsp. sugar
2 tablespoons oil
2 1/2 cups flour

1. Mix all ingredients together in mixer with dough hook.
2. Knead for 3-5 minutes until dough goes into a ball and is smooth. (if needed, add a couple of tablespoons of flour to help it not be too sticky.)
3. Roll up in plastic wrap and let sit for 30 minutes.
4. Preheat oven to 425 degrees. Split dough in half and roll out dough onto cookie sheet.
5. Melt a bit of butter and spread on dough with a pastry brush over crust.
6. Cook for 8 minutes.

Pizza Margherita

1 cup crushed tomatoes
1 tablespoon EVOO
1/2 cup basil leaves, coarsely chopped and julienned
1/2 cup freshly grated Parmesean
1/2 pound fresh mozzarella, sliced 1/2 inch thick

1. Preheat oven to 425 degrees.
2. In food processer, combine tomatoes, EVOO, salt and pepper to taste and process until smooth.
3. Spread sauce on dough.
4. Sprinkle basil leaves on top of sauce.
5. Sprinkle Parmesean cheese.
6. Arrange mozzarella cheese and tomatoes.
7. Cook for 15-20 minutes until edges are golden brown.

Rating: 4. I loved the crisp crust (we made it thin to be more true Italian) but the original recipe had the oven temp set to 500 degrees so we set off the fire alarm when the crusts got a little too crispy. Also, I would cut the mozzarella into smaller pieces to spread it out on the whole pizza.

Sunday, August 14, 2011

Week 28: Stuffed Bell Peppers

It has been some good eats here at the Benson house.

I have a bell pepper obsession. I love every color (especially yellow and orange) and they are the best addition to any dish.

This time we centered the dish around bell peppers. And it was delish.

Stuffed Red Bell Peppers

Recipe adapted from a few different recipes, but mostly based on Emeril's version.

3 beautiful bell peppers, tops cut away and seeds removed
1 tablespoons veggie oil
1/2 cup finely chopped onions
1/2 pound ground beef and ground turkey mixture (use whatever meat you want)
1/2 tablespoon garlic
1/4 cup chopped basil leaves (fresh from the garden, holla!)
1/8 cup chopped oregano (from my garden!)
1 cup chopped tomatoes
1/3 teaspoon salt
1/4 teaspoon pepper
Pinch red pepper flakes
1 cup cooked rice
4 ounces tomato sauce

1. Preheat over to 350 degrees.
2. In a large pot of boiling water, parboil* the peppers until just tender, 2 to 3 minutes. Removed with slotted spoon and dry on paper towel.
3. In a large saute pan or skillet, heat the oil over medium-high heat. Add the onions and chopped bell peppers and cook until soft about 3 minutes.
4. Add meat, tomatoes, garlic, oregano, basil, salt, black pepper and pepper flakes. Cook until meat is browned, breaking up the lumps with a spoon.
5. Add the rice and tomato sauce and stir well. Remove from heat and adjust the seasoning to taste.
6. Pour enough water into a baking dish to just cover the bottom, about 1/8 inch deep.
7. Stuff the bell peppers with the rice mixture and place in the baking dish.
8. Bake until peppers are tender and the filling is heated through. Usually 20-25 minutes.
9. Remove from oven, cool a bit and EAT!

*parboiling is when you partially cook a vegetable by boiling. I think of it as giving it a kick start before the baking.

Rating: 4.5. This was so good! It seems complicated, but it is basically Spanish rice stuffed into a pepper. Although, I changed mine and made it more Italian with the basil, oregano and red peppers. We scarfed the peppers up and Jacob at the leftover rice plain. That is just how good it was.

Wednesday, August 10, 2011

Week 27: Summer pasta

Our garden finally produced fruit!
It has been a long summer because we waited so long to plant, but finally we have something to pick!


Look at those beauts.
I am so proud of this meal because it has all the makings from our garden.
(And picked minutes before they were tossed in.)

 
Baked Pasta with Summer Vegetables
Serves 4
  • 6 ounces uncooked tube-shaped pasta (ziti, penne, rigatoni, etc.)
  • 1 tablespoon olive oil
  • 2 cups chopped yellow squash
  • 1 cup chopped zucchini
  • 1/2 cup chopped onion
  • 2 cups chopped tomato
  • 2 garlic cloves, minced
  • 1 cup (4 ounces) shredded part-skim mozzarella cheese, divided
  • 2 tablespoons chopped fresh basil
  • 2 teaspoons chopped fresh oregano (or 1/2 teaspoon dried oregano)
  • 3/4 teaspoon salt, divided
  • 1/8 teaspoon crushed red pepper
  • 1/3 cup part-skim ricotta cheese
  • 1 large egg, lightly beaten
  • Cooking spray
Preheat oven to 400° F.

Cook pasta according to package directions.

Meanwhile, heat olive oil in a large skillet over medium-high heat. Add squash, zucchini, and onion; sauté 5 minutes. Add tomato and garlic; sauté 3 minutes. Remove from heat; stir in pasta, 1/2 cup mozzarella, herbs, 1/2 teaspoon salt, and pepper.

Combine ricotta, remaining salt, and egg. Stir into pasta mixture. Spoon into an 8-inch square glass or ceramic baking dish coated with cooking spray; sprinkle with remaining mozzarella. Bake at 400° for 15 minutes or until bubbly and browned. Serve with salad greens. 


Note: I did not have ricotta cheese so I subbed it for Parmesan.

Rating: 4.8 This meal was delicious. Like Mmm mmm, good. (Sorry for the trademark, Campbell's. I can't think of any other way to describe how good it was. 

Tuesday, August 9, 2011

Week 26: Heavenly tomato soup

In June the girls in the family went to a cooking class at La Jolla Groves.
It was three hours of delicious food from a fabulous chef.

One of the recipes was tomato soup that made me cry for joy. Love it.


Tuscan Tomato Soup
(Adapted from Kent Andersen's recipe)

1 1/2 tablespoons olive oil
1 large onion, diced
2 1/2 cups diced and seeded tomatoes (I used canned tomatoes because our garden is a bit behind)
1 cup chicken stock
3/4 cups heavy whipping cream (I just used milk, whipping cream is not usually in my fridge)
1/2 cup basil pesto
Salt and pepper to taste
Optional: add tomato paste to adjust color and flavor or if it was too water

1. Heat oil in a medium large soup pot. Coat the bottom of pan and let that get hot.
2. Add the onions and cook until translucent
3. Add tomatoes and warm to a simmer
4. Add chicken stock and simmer for 15 minutes
5. Add pesto and whipping cream. Do not boil soup after cream is put in it.
6. Blend to desired consistency. (I used my trusty blender)
7. Use s & p to taste.


And this soup is the perfect way to class up your grilled cheese. Seriously.

Rating: 4.5.The only downside is that it is a little rich so it makes it hard to eat a ton, but I love it.

Sunday, July 10, 2011

Week 24: Fancy pasta

 Cappellini Pomodoro

This is a tried and true family favorite.
It is so simple and these 4 main ingredients taste ah-mazing.


1 cloves garlic, minced
1 pounds plum tomatoes, seeded and diced
1/2 ounce fresh basil leaves, minced
1/6 cup extra-virgin olive oil
1 1/2 ounces Parmesan cheese
6 ounces dry angel hair pasta, cooked (I used spaghetti sometimes)
1/8 teaspoon pepper

Heat olive oil and add garlic. Cook until garlic turns white.

Add tomatoes and pepper. Heat through, stirring constantly, about 2 to 3 minutes. Tomatoes should not lose their shape.

Remove from heat. Transfer hot, cooked pasta to large bowl. Toss pasta gently with tomato mixture, basil and half of Parmesan cheese.

Serve immediately with the remaining Parmesan.

Rating: 5. This never disappoints. So simple yet delicious.


Friday, July 8, 2011

Week 21: Artichokes

A few weeks ago we got artichokes in our Bountiful Baskets.
I would consider myself a connoisseur of spinach artichoke dip (Red Robin has the best one, hands down. Trust me, I have tried a lot.)
But I am a bit uncomfortable with artichokes when they are not in dip form.

So we kind of winged it.

Get your artichokes. Cut off stem, leaving an inch so it can stand up right.
Put a couple inches of water in a pot. Add in some chopped garlic and a little lemon juice.
Place in artichokes in pot so they are standing up right.
Boil for about 30 minutes or until tender.
Pull out and admire. (look at those juicy babies above.)

 Start pulling off leaves from the outside working in.
Put leave in mouth, close teeth and pull out, pushing the insides of the tip in your mouth.
(Yes, I did not know this is how you ate them. You mean you don't eat the leaf?)

We made dipping sauces.
Mayo/miracle whip with a little paprika.
Mayo/miracle whip with a little Dijon mustard.

You know you are done when your plate looks like this.
While it is a bit tedious to eat, it was a lot of fun.

Rating: 3.7. While I don't know if I would ever crave eating an artichoke like this, it was a lot of fun. And we laughed the whole time.

Thursday, June 23, 2011

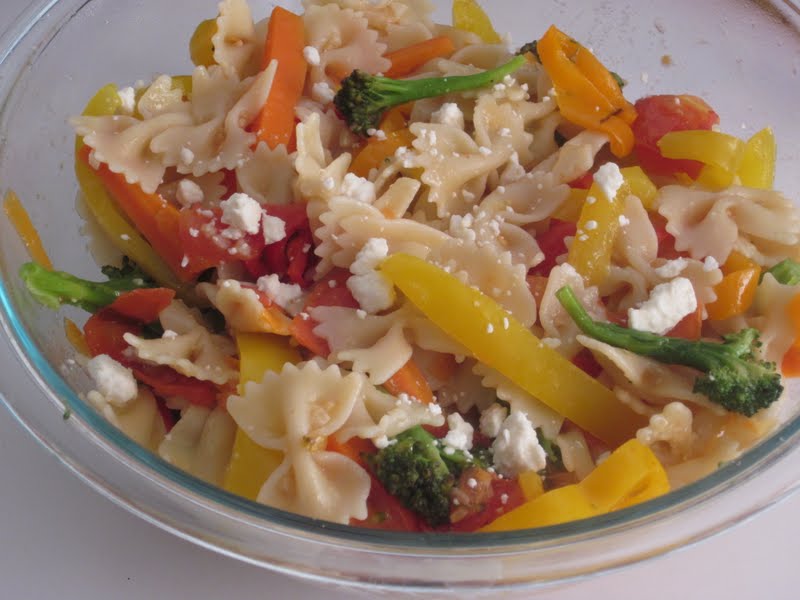
Week 19: Pasta Primavera

Alright, alright. I'm behind on my weekly new recipes, but in all actuality I have been on it. It is the posting I am behind on.

This week we noshed on Pasta Primavera. Primavera means spring, but my mom said it means vegetable. I determine it should mean spring vegetables. We're all about compromise here.

I have developed a love affair with Bountiful Baskets. I am a card carrying "fruit person," but I fallen in love with vegetables. We eat so much healthier when we order BB because I refuse to throw away produce, so we eat it instead. And we are eating so much better because of it.

But the real perk of BB is that is guides what I make for dinner. No longer are the days when I come home from work and sit in the kitchen as my stomach gurgles with hunger pangs, trying to decide what to make. It gets to the point when nothing sounds good and I don't eat until 8 p.m. Well, NO MORE! I plan my meals around what we get in BB and it takes a lot of guessing out of it. BB did not endorse this post, however, I would happily become their spokeswoman. :)

On to the recipe. This meal is perfect to throw in whatever vegetables you have on hand.

PASTA PRIMAVERA
Serves 4. Takes about 30 minutes


12 oz. fusilli or other corkscrew pasta (we only had bowtie on hand and it worked fine)
1/2 pound sugar snap peas or broccoli (we used what we had on hand- broccoli)
2 carrots, shredded
1 yellow bell pepper, cut into strips (have a red or orange? Toss them in, too!)
1/4 cup EVOO
4 cloves garlic, thinly sliced
1 pint cherry tomatoes (we used normal ones which we had on hand)
1/4 tsp red pepper flakes (gentle, people. Don't over do it.)
1/2 cup grated Parmesan cheese
4 ounces Feta Cheese, crumbled (recipe calls for goat. Any crumbly will do.)
Optional: 1/2 cup chopped fresh mint

1. Cook noodles according to instructions.
2. Add peas/broccoli, carrots and bell peppers to boiling water for the last two minutes. Reserve 1/2 cup cooking water and then drain pasta.
3. Meanwhile, heat EVOO in a large skillet over medium heat.
4. Add garlic and cook until just golden, about 30 seconds.
5. Add the tomatoes, red pepper flakes and 1 tsp salt; cook until tomatoes begin to wilt, usually about 2 minutes.
6. Stir in 1/4 cup of reserved cooking water.
7. Pour tomato mixture over pasta and vegetables.
8. Add Parmesan and half of crumbly cheese and toss to combine. Season with salt.
9. Divide among bowls. Tops with remaining cheese and give a small drizzle of olive oil.

Rating: 5. This was awesome. The vegetables perfectly complement the pasta, and the EVOO just... well, wow. Heart.


Recipe adapted from the Food Network.

Friday, June 10, 2011

Week 18: Chicken and spaghetti with pesto

Glamour magazine touted this recipe as 'the fast pasta you can even cook for company.' I was determined to see if their claim was true. (You never know. Earlier they claimed the magical powers of 'Engagement Chicken', a chicken dish that is supposed to result in a proposal. Since I am already hitched, this would be hard to test out. They also have a pregnancy meal but we are not ready to test that one out. And while I think it is a bit far fetched, I am not taking any chances.)


Chicken Spaghetti with Pesto
originally found in Nov. 2009 issue of Glamour Magazine. Adapted to my tastes.


2 oz. dry whole wheat spaghetti (I love whole wheat, Jacob hates it. Good thing the recipe called for it.)
4-6 chicken tenderloins
Salt and pepper to taste
2 tbsp. pesto sauce
1 tsp. olive oil
1 tsp. shredded Parmesan
Fresh basil (optional, but fun)

1. Boil the spaghetti according to directions on the package.
2. Meanwhile, heat up a saute pan over medium heat.
3. Season thawed chicken with salt and pepper. (I used sea salt.) Cook a few minutes on both sides until cooked all of the way through. When finished, slice crosswise.
4. Drain spaghetti, reserving 1/2 cup of cooking water.
5. Toss spaghetti with chicken, pesto (which I warmed in the micro for 10 seconds), olive oil and enough cooking water so that the pesto spreads evenly over the noodles.
6. Sprinkle with Parmesan and and basil on top. After the photo, we sliced the basil and put it on top.

Rating: 5. This was super easy considering I had little to prepare. We keep a jar of prepared pesto on hand, as well as grated Parmesan cheese. It was delicious, fast AND easy which is big in my book.

Thursday, June 9, 2011

Week 17: What do you do with Anaheim peppers?

This week in Bountiful Baskets we received 6 Anaheim peppers.  After a quick Google search, I found out what an Anaheim pepper is (a mild chile pepper), and a recipe to boot.

Spanish Fried Rice ala Food Network.

Alas, another poor food photo. My apologies.

  • 6 tablespoons olive oil
  • 1 medium onion, diced
  • 2 Anaheim pepper, diced
  • 4 cups cooked white rice
  • 1/2 teaspoon paprika
  • 1/2 teaspoon chili powder
  • 2 cloves garlic, minced
  • 6 ounces tomato sauce
  • 4 Roma tomatoes, chopped
  • Salt and freshly ground black pepper
  • 1 bunch green onion, chopped

Directions

Heat oil in skillet over medium heat. Add onion and peppers and cook for 1 minute. Add rice and toss to coat well in the oil. Adds the paprika, chili powder and garlic. Cook tossing for 1 minute. Slowly add tomato sauce and tomatoes, in small increments, cooking off the liquid. Season with salt and pepper, to taste. When the rice is cooked and has nice red color and none or very little liquid remains, remove to a bowl or plate and garnish with green onions.


Rating: 4.5.
It was really good. And we fought over the leftovers.

Note: I know I'm behind on my weeks, but I have been cooking just not posting.

Friday, May 20, 2011

Week 14- Caramel cookie adventures

Thank you for sticking with me through our adventures! You are the best.


I got a little behind on my weekly recipes with the trip and recovering from the trip. (shouldn't there be a grace period after each vacation to recover?) But the new recipes have been coming.

I though it was time for a dessert. My BFF Melissa gave me a late Christmas present of a recipe and the necessary ingredients for a delicious cookie bar. (including an apron I adore.) I made them for a get together. Yes, I am crazy for trying a new recipe for a group of people, but it made a lot and it would be physically impossible for me to work off all of the calories at the gym that I would have gained by consuming the entire pan. (But it would've been delicious.)

CARAMEL COOKIE BARS

2 c. real butter softened
2 1/4 c. brown sugar
3 c. flour
3 c. quick Quaker Oats
1 tsp. salt
2 tsp. soda
1 bottle of Mrs. Richardson's butterscotch ice cream topping (I could eat this by the spoon.)
1 pkg. milk chocolate chips

1. Mix first 6 ingredients in a very large bowl.
2. Take out 1/2 of mixture and set aside.
3. Press remaining mixture into large cookie sheet.
4. Bake for 10 minutes at 350.
5. Let cool a bit and spread on caramel topping.
6. Sprinkle on chocolate chips and cookie crumbs.
7. Bake for an additional 10-12 minutes at 350.
8. Take out and LOVE IT.

We ate it at the party with ice cream on top. I thought it was OK with the ice cream. But we ate it alone later and it was much better.

When I asked Jacob what he rated it he said, "Oh, at least a 4.7." Well, said.

Thursday, March 31, 2011

Week 12: Beans, beans, the magical fruit... well, you know the rest

It has happened, people.
I have made beans delicious.
Well, Jamie Oliver created the recipe and I made his recipe, so in a roundabout way, I made beans delicious. The special ingredients are garlic and cheese. Sink me

A story about beans: I hate them. They are squeaky when you eat them and they are gross. Plus the song about beans is gross too. Fun to sing, but gross.
Imagine my dismay when we received beans in our Bountiful Baskets.
I was strolling through the library (read: picking up a book for work and conveniently exiting by the cookbook aisle. Did you know you can check out cookbooks from the library? Love it.)

My cookbook requirements are regular recipes and picture for each.
I picked up Jamie Oliver's "Jamie's Food Revolution" and it fit the bill.

Currently it is covered in Post-it notes for all the recipes I want to try.
And the beans recipe came at me in my time of necessity.


Best Ever French Beans
Recipe adapted from 'Jamie's Food Revolution'.

A bunch of French beans (beans can be French? I just used regular ones.)
1 clove of garlic, sliced
1/2 cup grated Parmesan cheese
Extra virgin olive oil
A swig of lemon juice

Cook beans in a large saucepan of boiling water with a pinch of salt for 6 minutes.
Beans are done when they are soft and not squeaky when you eat them.
(Does this mean all the squeaky beans I have been eating have been undercooked?)
Drain beans while reserving some cooking water. Set aside, let them steam dry in colander.

Put pan back on heat. Toss a swig of EVOO and the garlic.
When the garlic turns golden-ey delicious, put in beans and cover them with the oil and garlic.
Add some of the reserved water (start with a little and add more later if you need it).
Add the cheese and a swig of lemon juice (add more if you like the lemony flavor).
Stir and simmer until the water and cheese turn into a delicious oozy (yes, in the case oozy is good) sauce. It should be sticky and a little thicker. Thicker = heaven.
Remove from heat and eat!

Note: I eyeballed all of the quantities. The first time we made it according to Chef Oliver, and it had waaaaay too much garlic, which is hard to do because I la-la-love garlic. The recipe had the bean quantity in weight, so I just guessed. Adjust ingredients to how you see fit.

Rating: 4.5
It's not quite a 5 because I am still eating beans.And garlic and cheese can only do so much to mask the beans. But these are good. Real good.